Connecting Bitrix24 to Qenguru AI
Step-by-step guide: installing from the Marketplace, connecting via OAuth, setting up CRM routing.
What you get
- Leads and deals created automatically from bot conversations
- Contact sync: name, phone number, messenger
- Conversation history saved to the customer card
- Open Lines — the bot as first-line support
- Returning customers automatically routed back to their previous managers
- Mapping of custom CRM fields
What you need
- Bitrix24 portal administrator access
- A Qenguru account (accounts are issued by a manager — don't have one yet? Request access)
- A clear idea of the bot's task: what it should do and whom it should answer
Step-by-step guide
Step 1. Install the QenguruAI app from the Bitrix24 Marketplace
Open your Bitrix24 portal → Market → find the QenguruAI app and click Install. Only a portal administrator can install the app (a security requirement, since the app requests access to the CRM).
Once installed, a QenguruAI item appears in the portal's left-hand menu — click it.
Step 2. Sign in to Qenguru
A sign-in page opens. Sign in with your email and password. If you don't have a Qenguru account yet, a manager issues one: request access and we'll get you connected.
After signing in you land on the Qenguru dashboard, with your organizations and agents listed on the left.
Step 3. Create an agent or open an existing one
An agent is the bot that talks to your customers. Each agent has its own system prompt, knowledge base and set of channels.
Open the agent you need → the Prompts tab → the Prompt settings section. This is where you set the system prompt (the main instruction: role, rules, tone) and details about your company: what it does, its address and opening hours.
The greeting, the start prompt and the message sent on a technical error live in the Agent terms section; the tone of replies is set in Agent behavior.
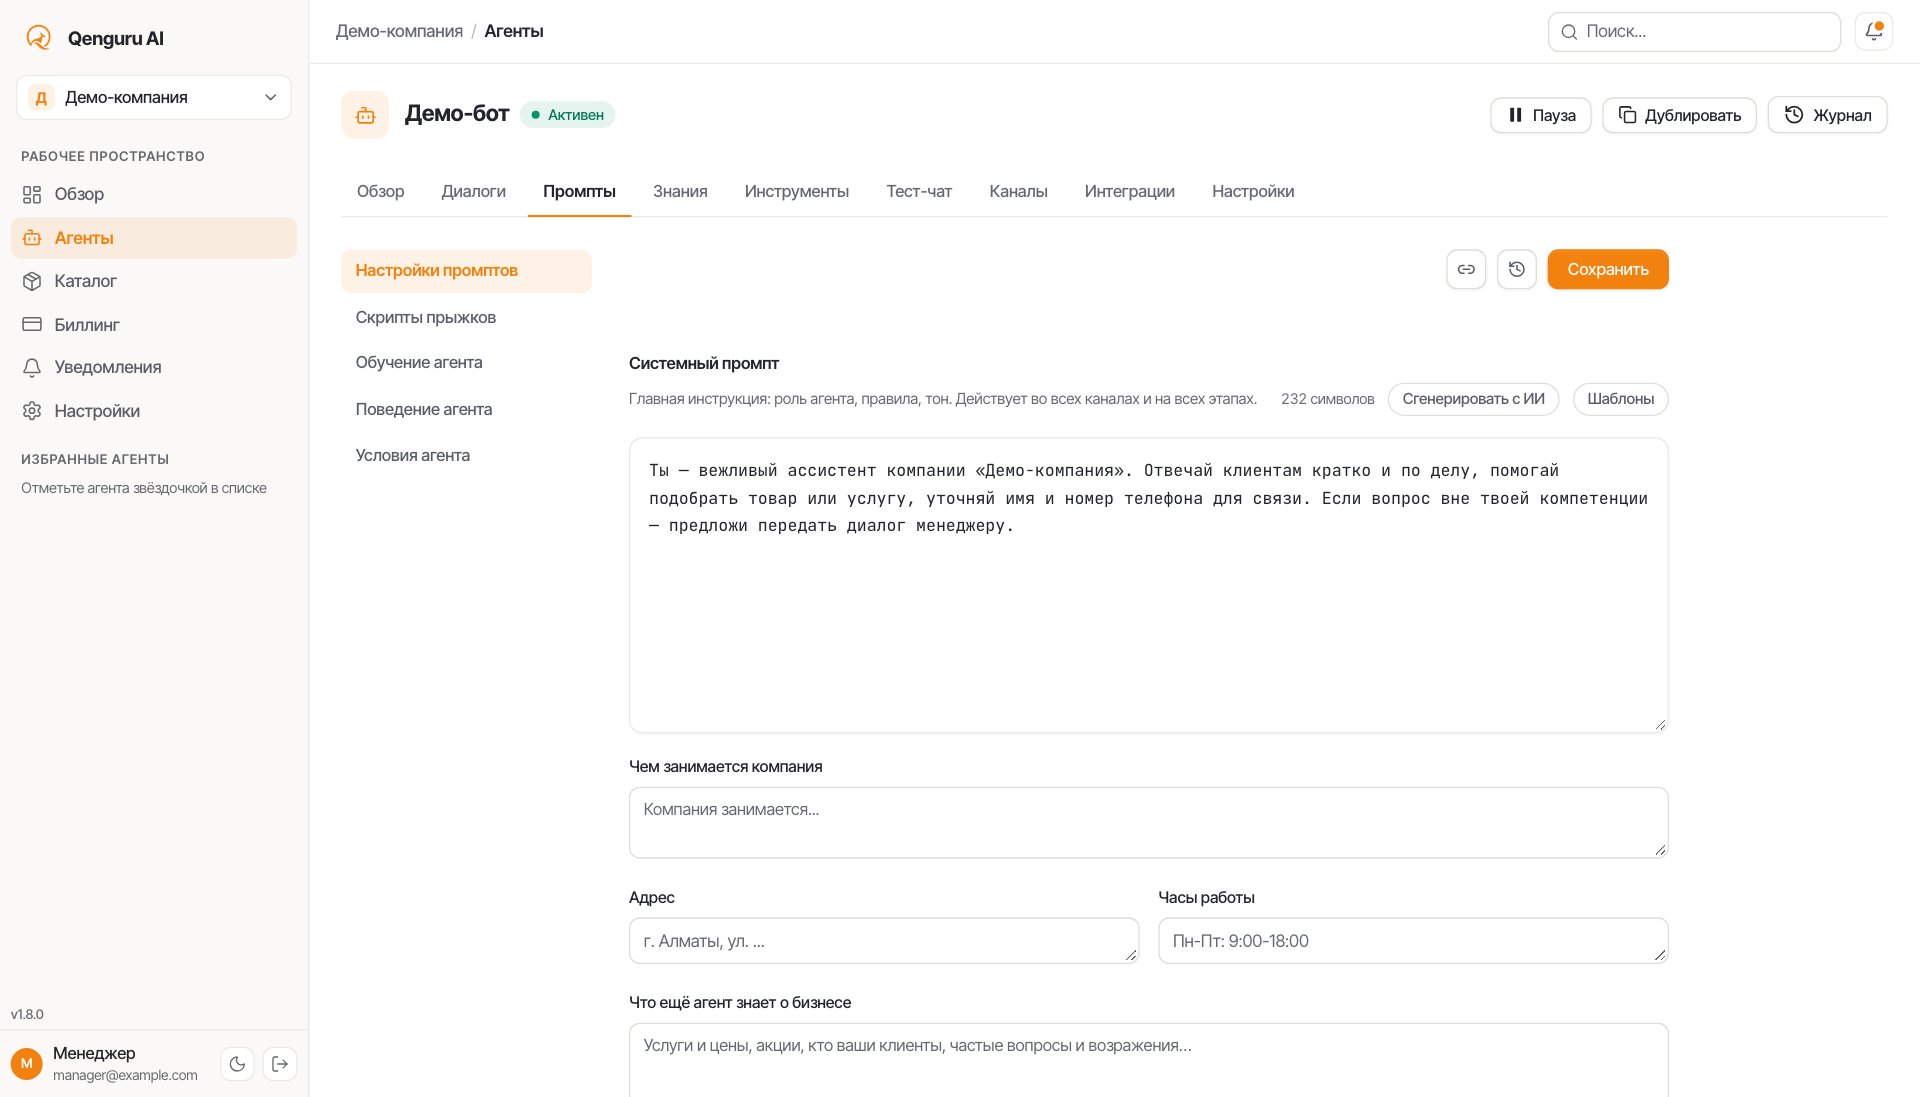
Step 4. Connect your messaging channels
Open the Channels tab. This is where you connect the channels the bot will use to answer customers: 2GIS Reviews, Telegram Bot, Telegram (account), WhatsApp, Instagram, website widget (Website Chat), Wazzup, ChatApp, Email.
Each channel has its own Connect button. Connection instructions appear right in the interface.
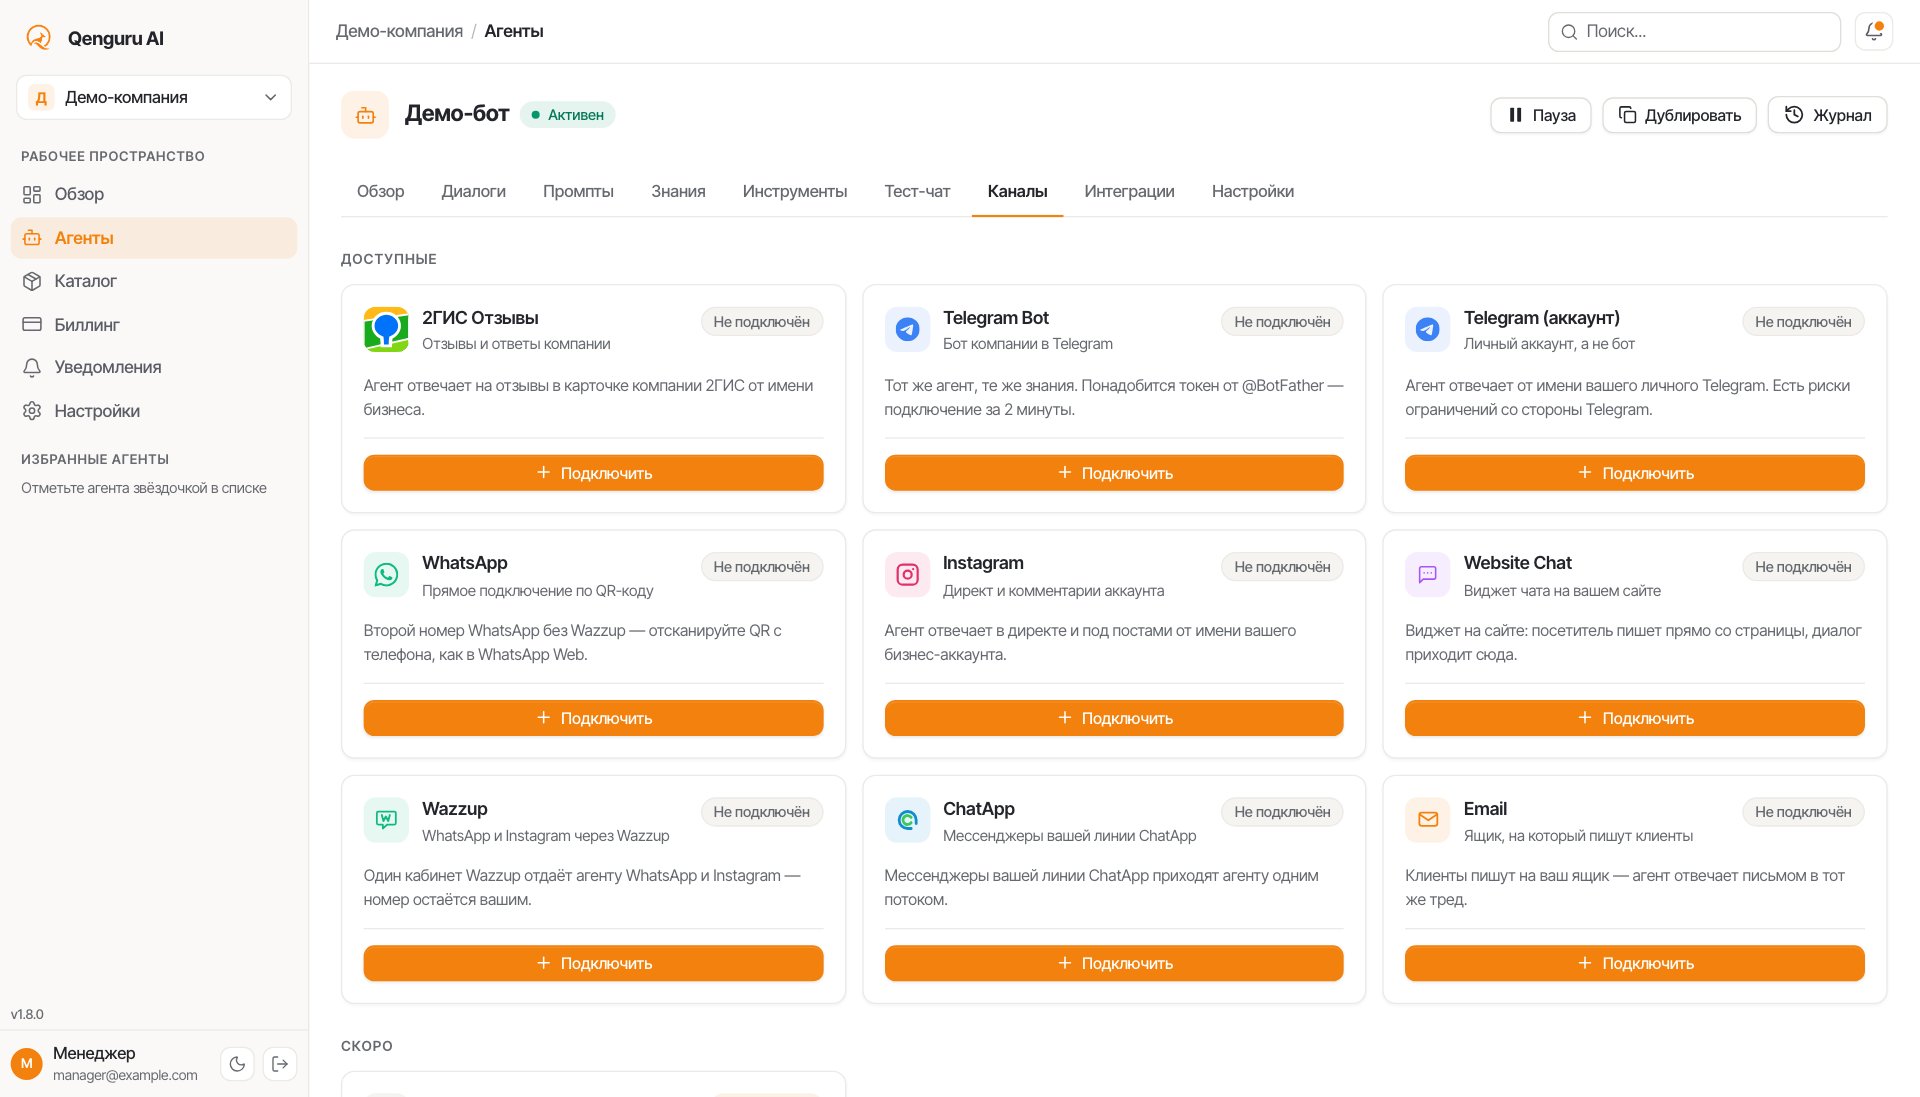
Step 5. Open the Integrations section
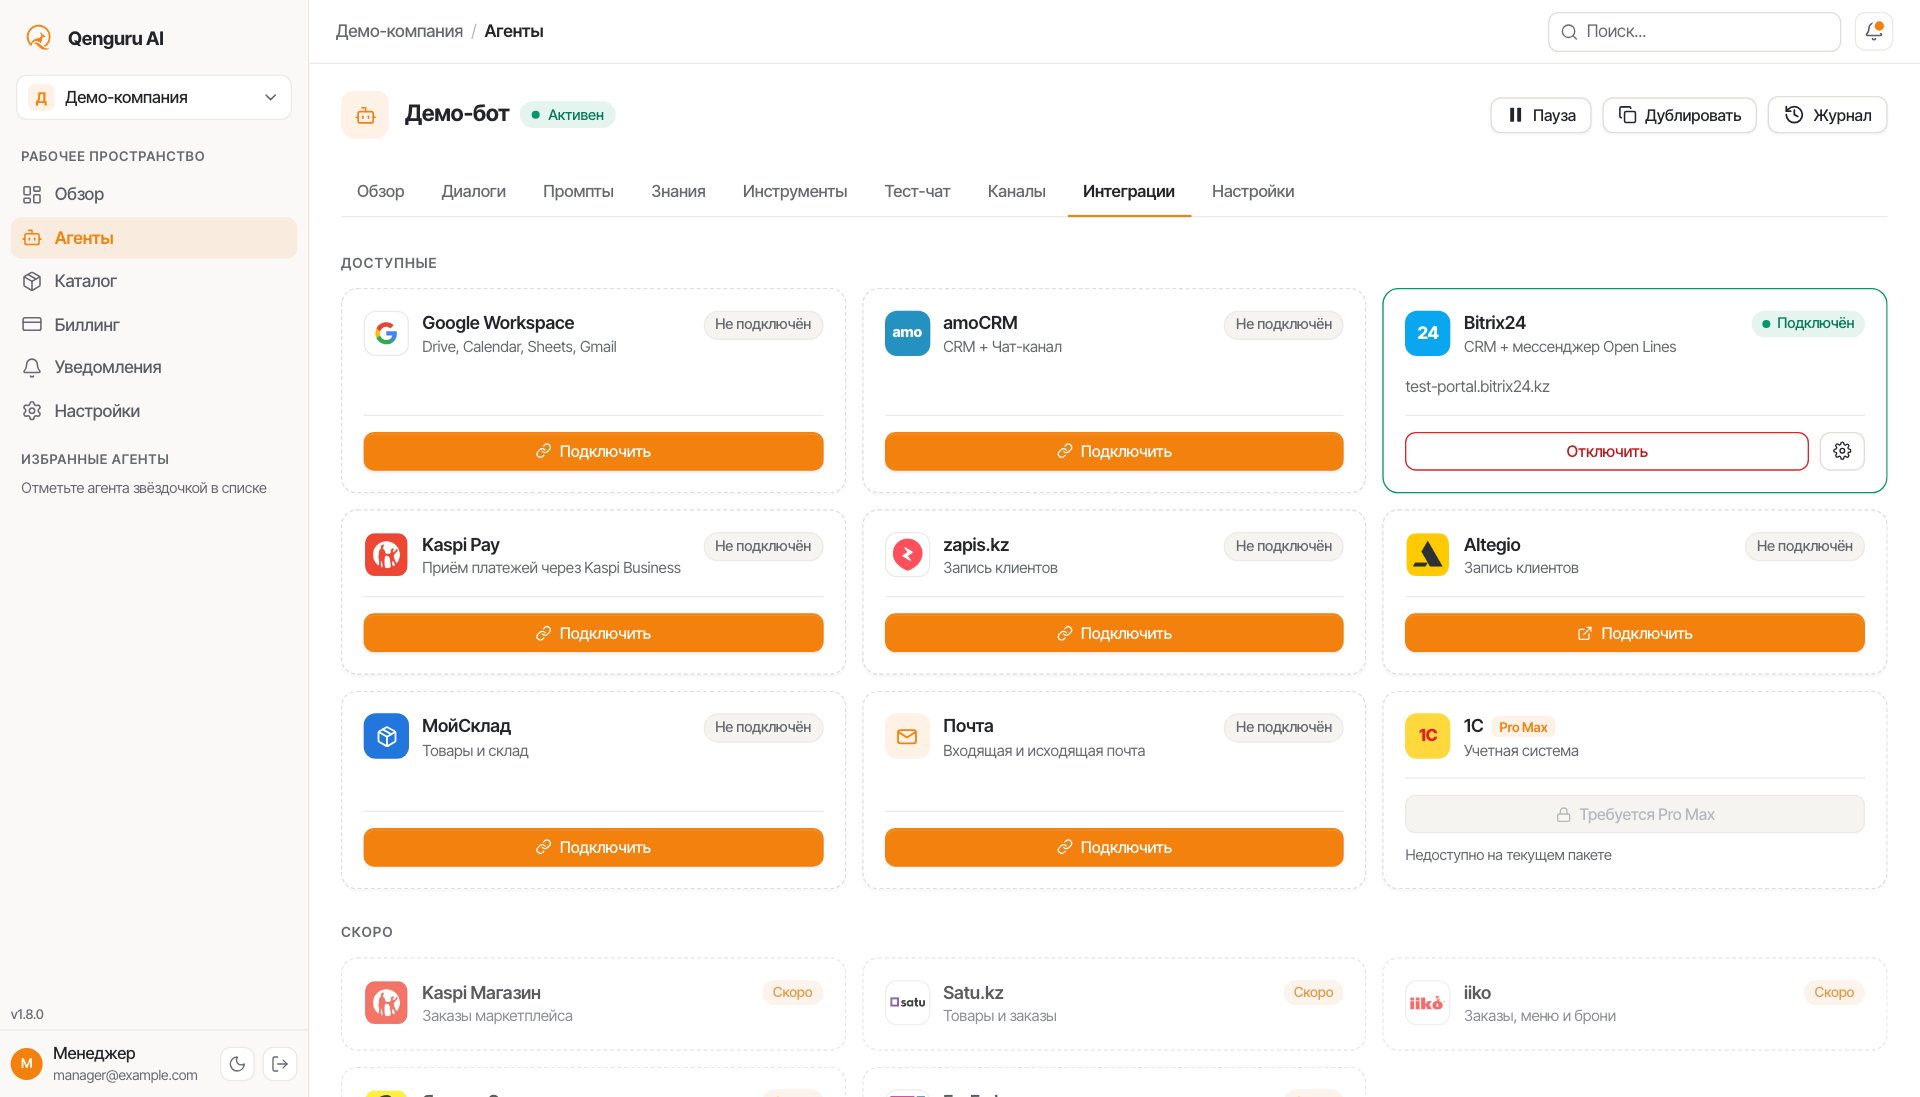
Go to the Integrations tab. In the right-hand column you will see the Bitrix24 card with the status “Not connected” and a Connect button.
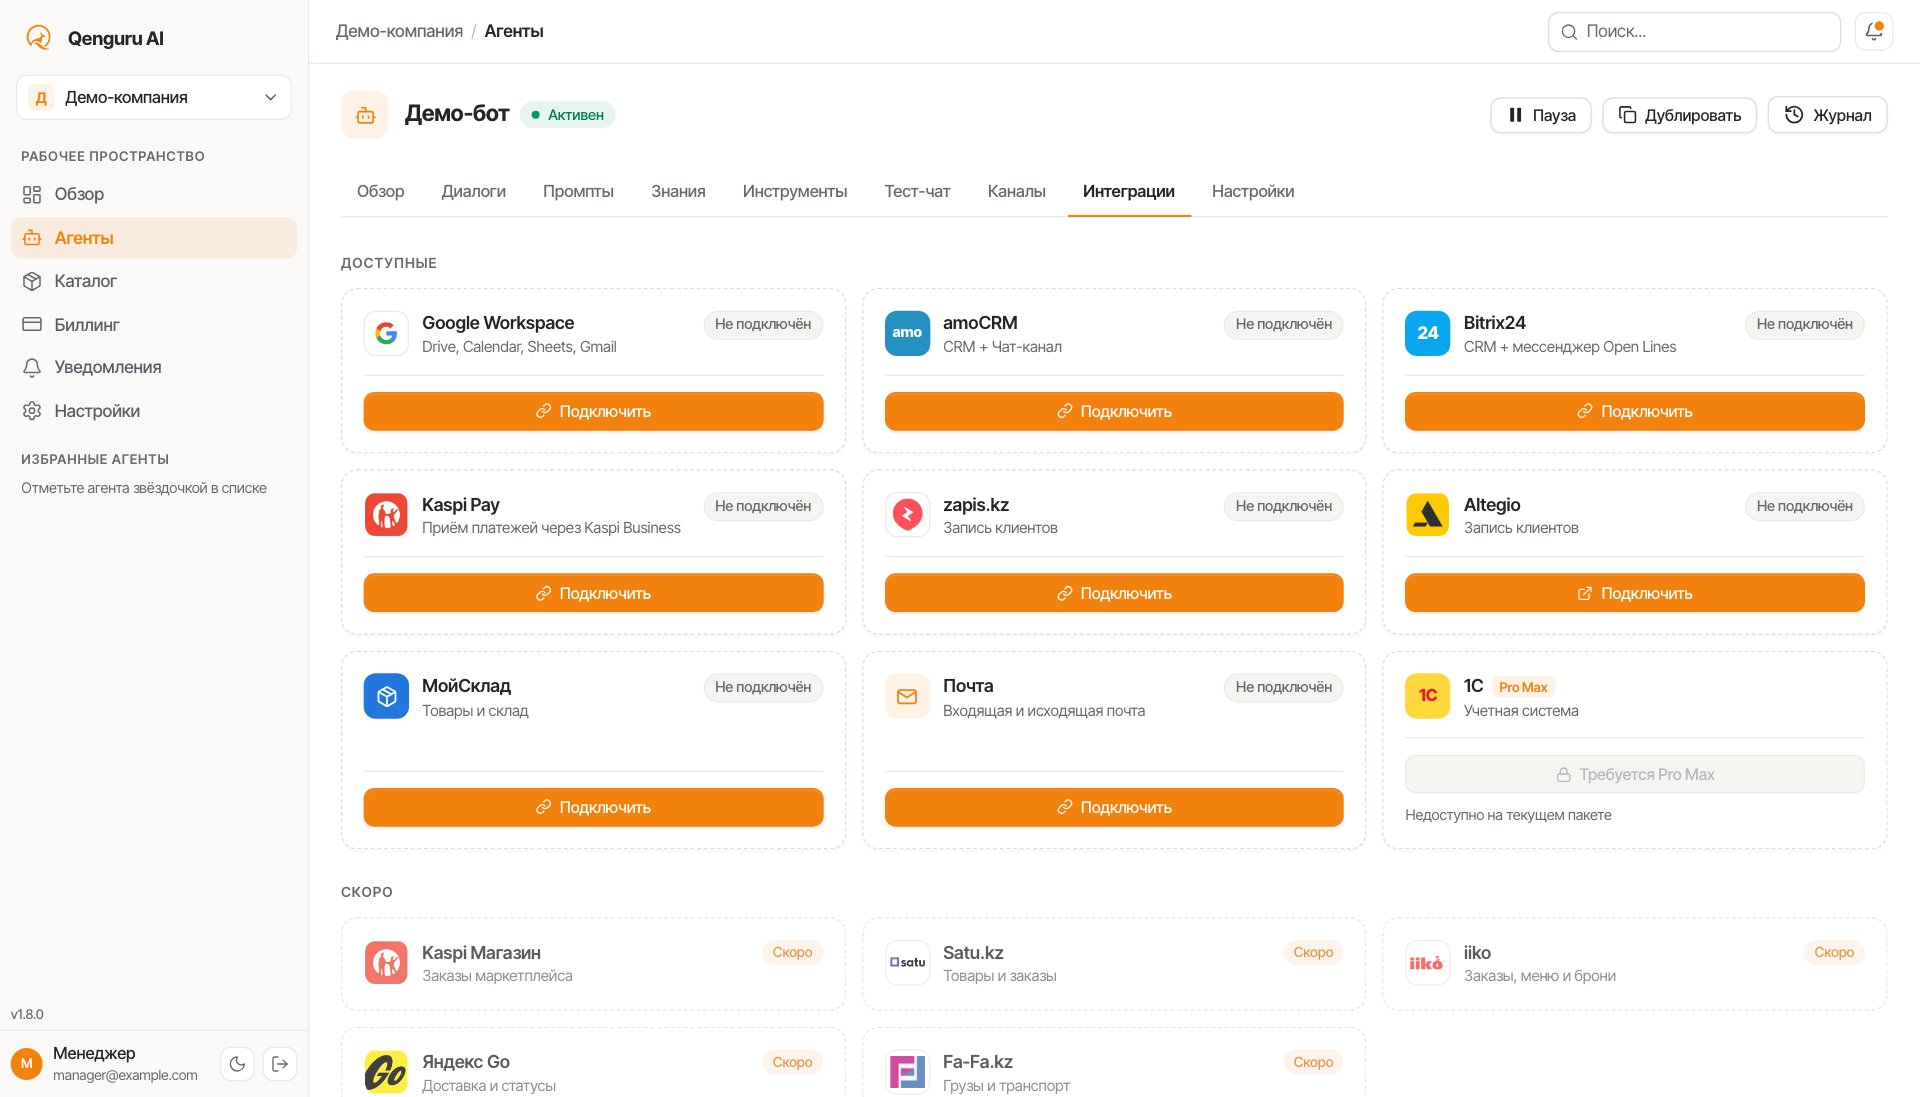
Step 6. Connect via OAuth
Click Connect — the Bitrix24 dialog opens on the Connection tab. Enter your Bitrix24 portal address in the form yourcompany.bitrix24.kz (without https://) and click “Authorize with Bitrix24”.
A Bitrix24 window opens asking for permissions — click Allow. Once authorization succeeds, the dialog switches to the CRM settings tab by itself (the tab stays locked until the portal is connected).
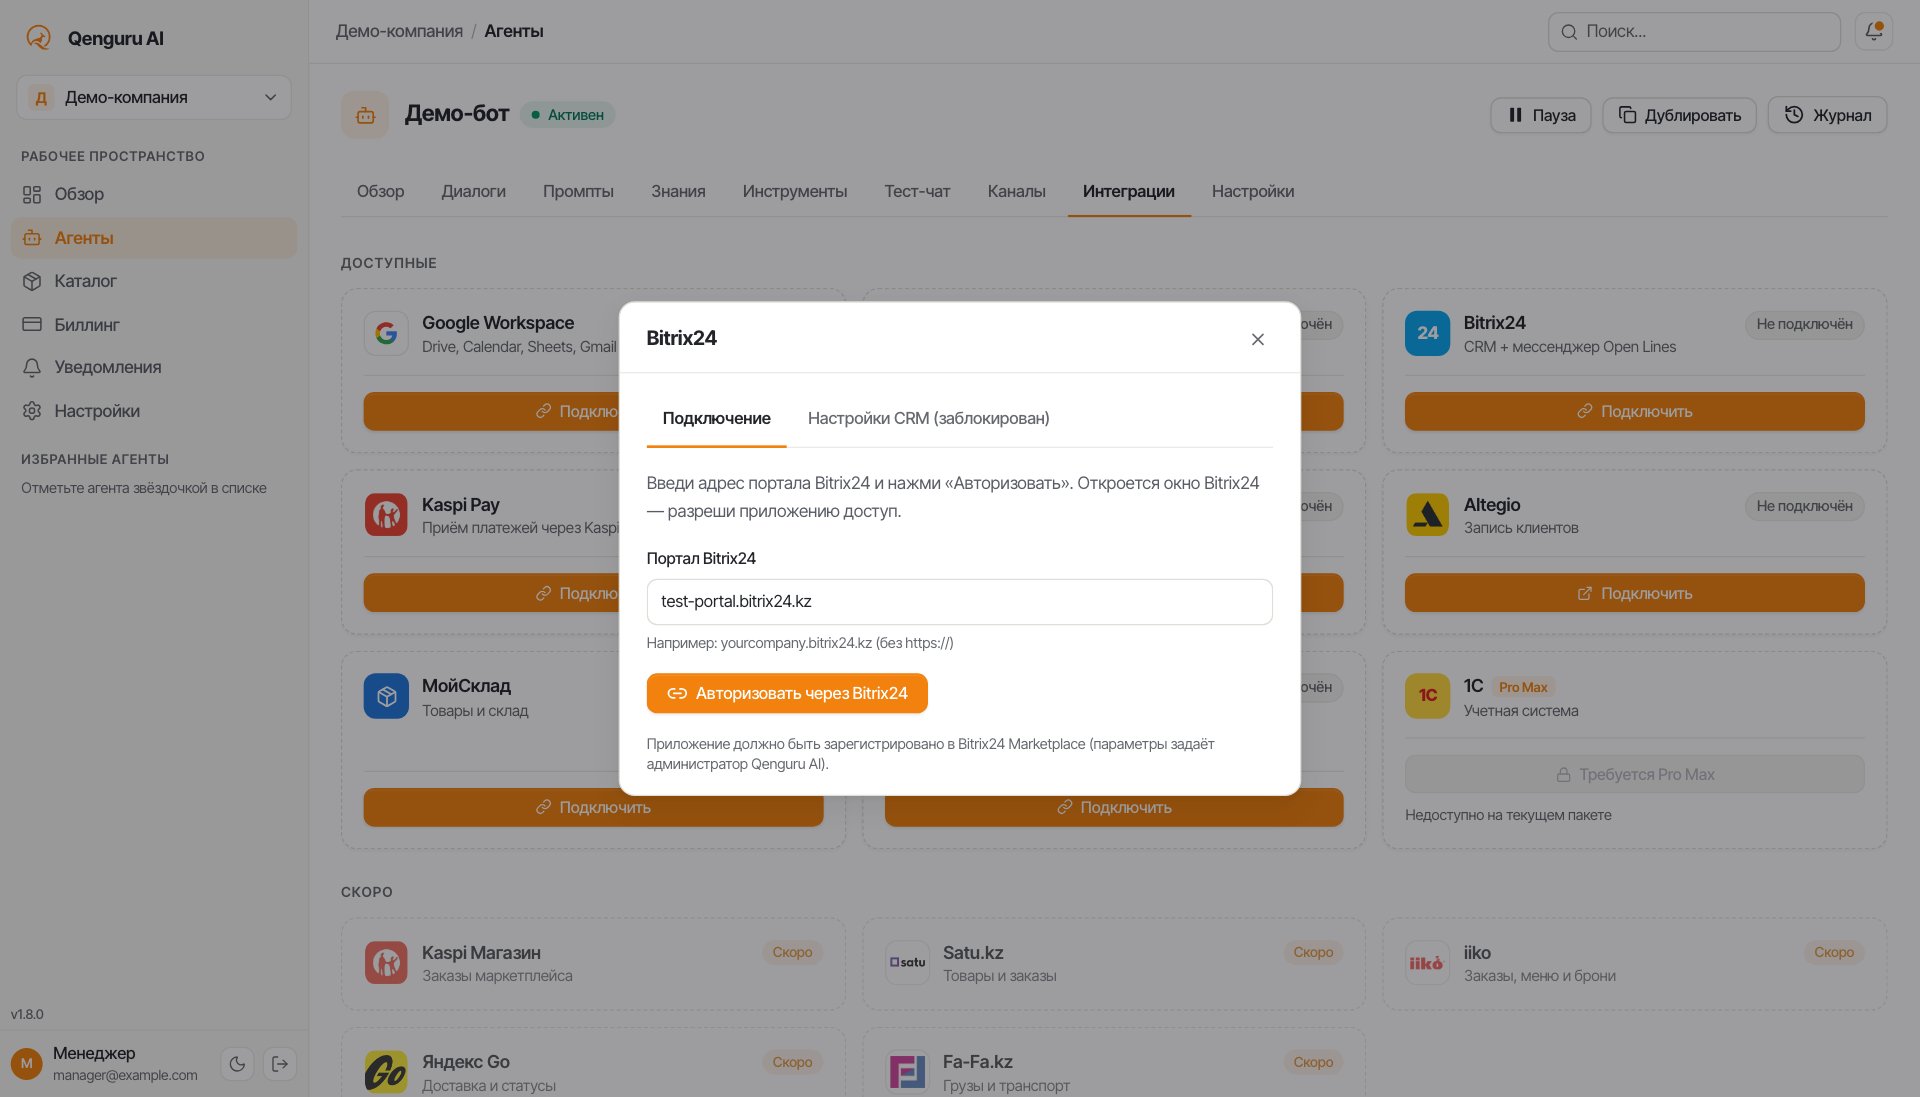
Step 7. Connection established
After successful authorization, the Bitrix24 card shows the status Connected and your portal address. The card now has a Disconnect button and a settings (gear) icon.
Step 8. Set up CRM routing
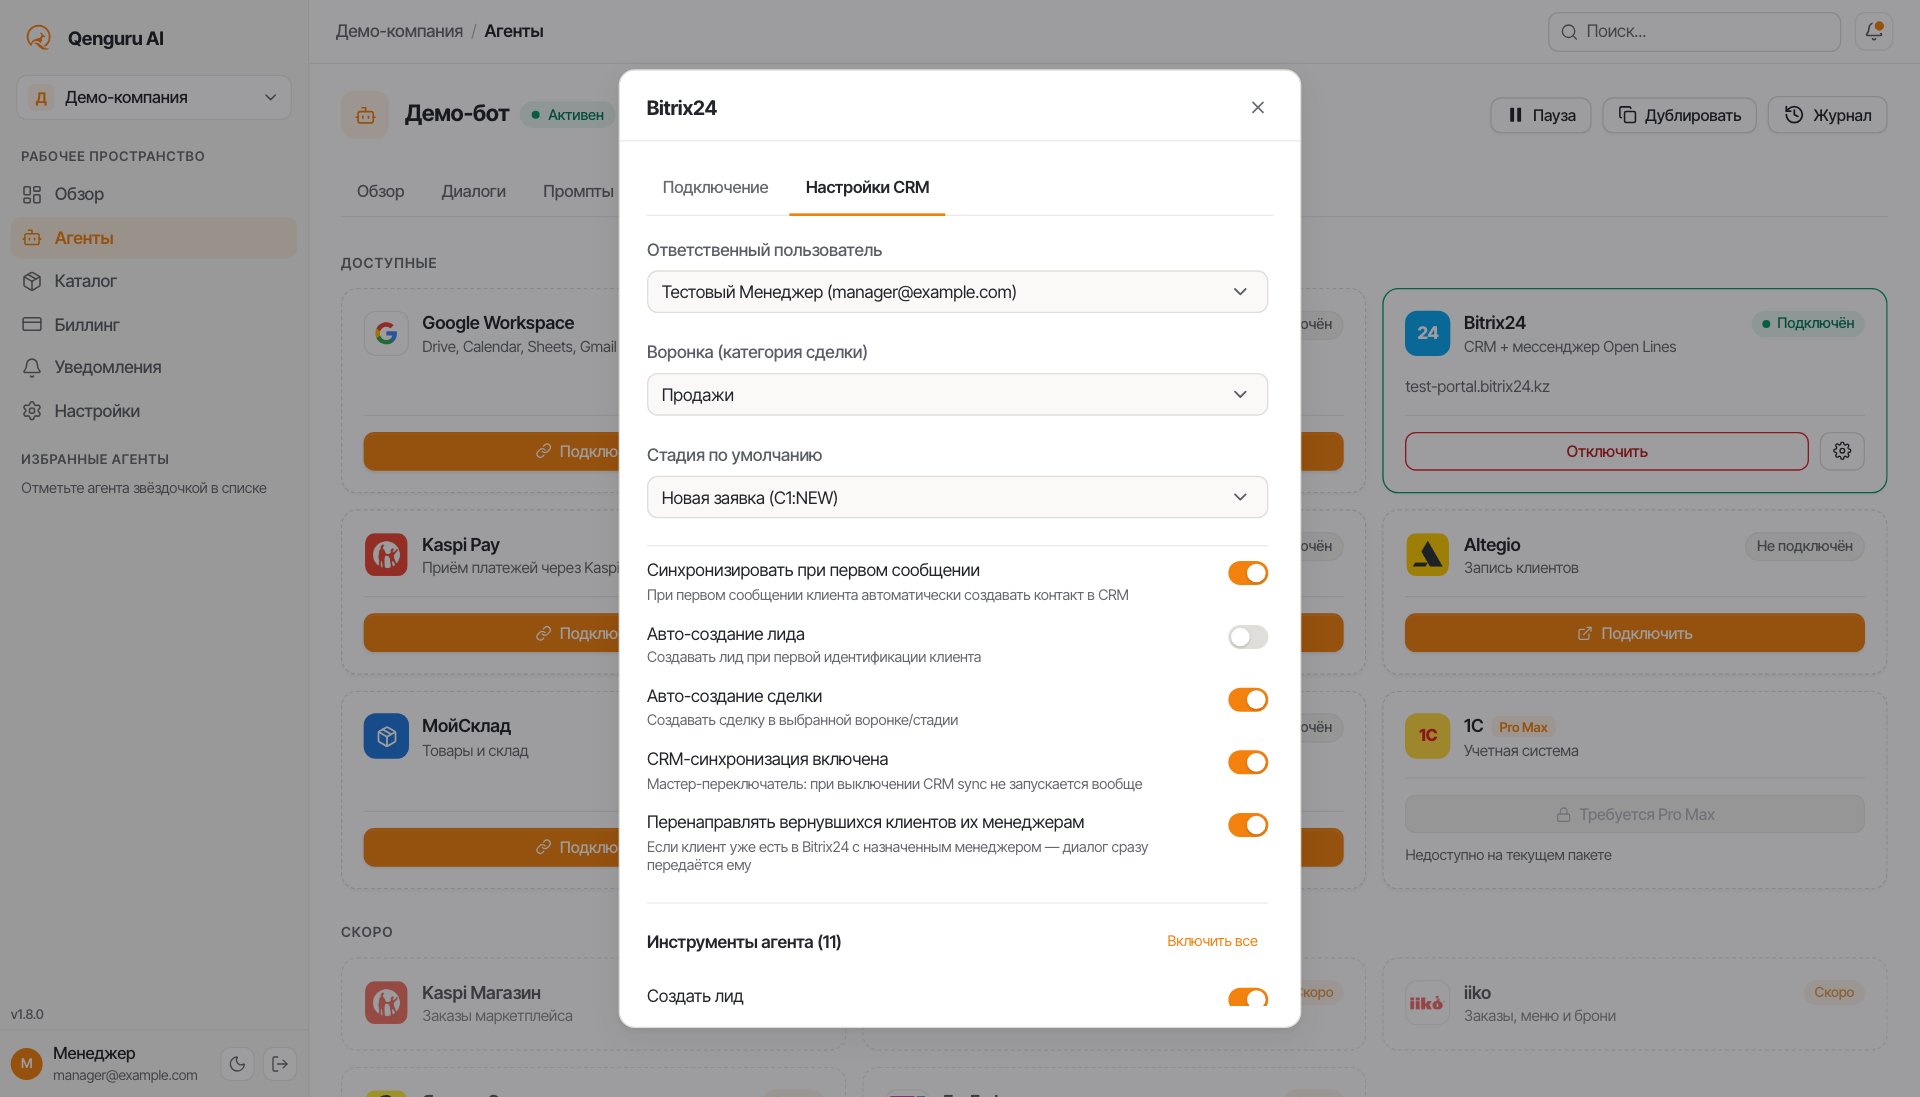
Click the settings (gear) icon on the Bitrix24 card → the CRM settings tab. This is where you define how the bot works with your CRM:
- Responsible user — who the new leads and deals are assigned to.
- Pipeline and default stage — where new deals go.
- Sync on first message — create the contact automatically.
- Create leads / deals automatically — separate toggles.
- CRM sync — the master switch for the whole integration.
- Route returning customers — if the customer already exists in Bitrix24 with an assigned manager, the conversation is handed over to that manager automatically.
- Agent tools — what the bot may do in Bitrix24 during a conversation: create a lead or deal, find a customer, add a comment, hand the conversation over to an operator and more. Each tool has its own toggle.
Changes are saved right away; the Done button is at the bottom of the dialog.
Step 9. Switching to another portal
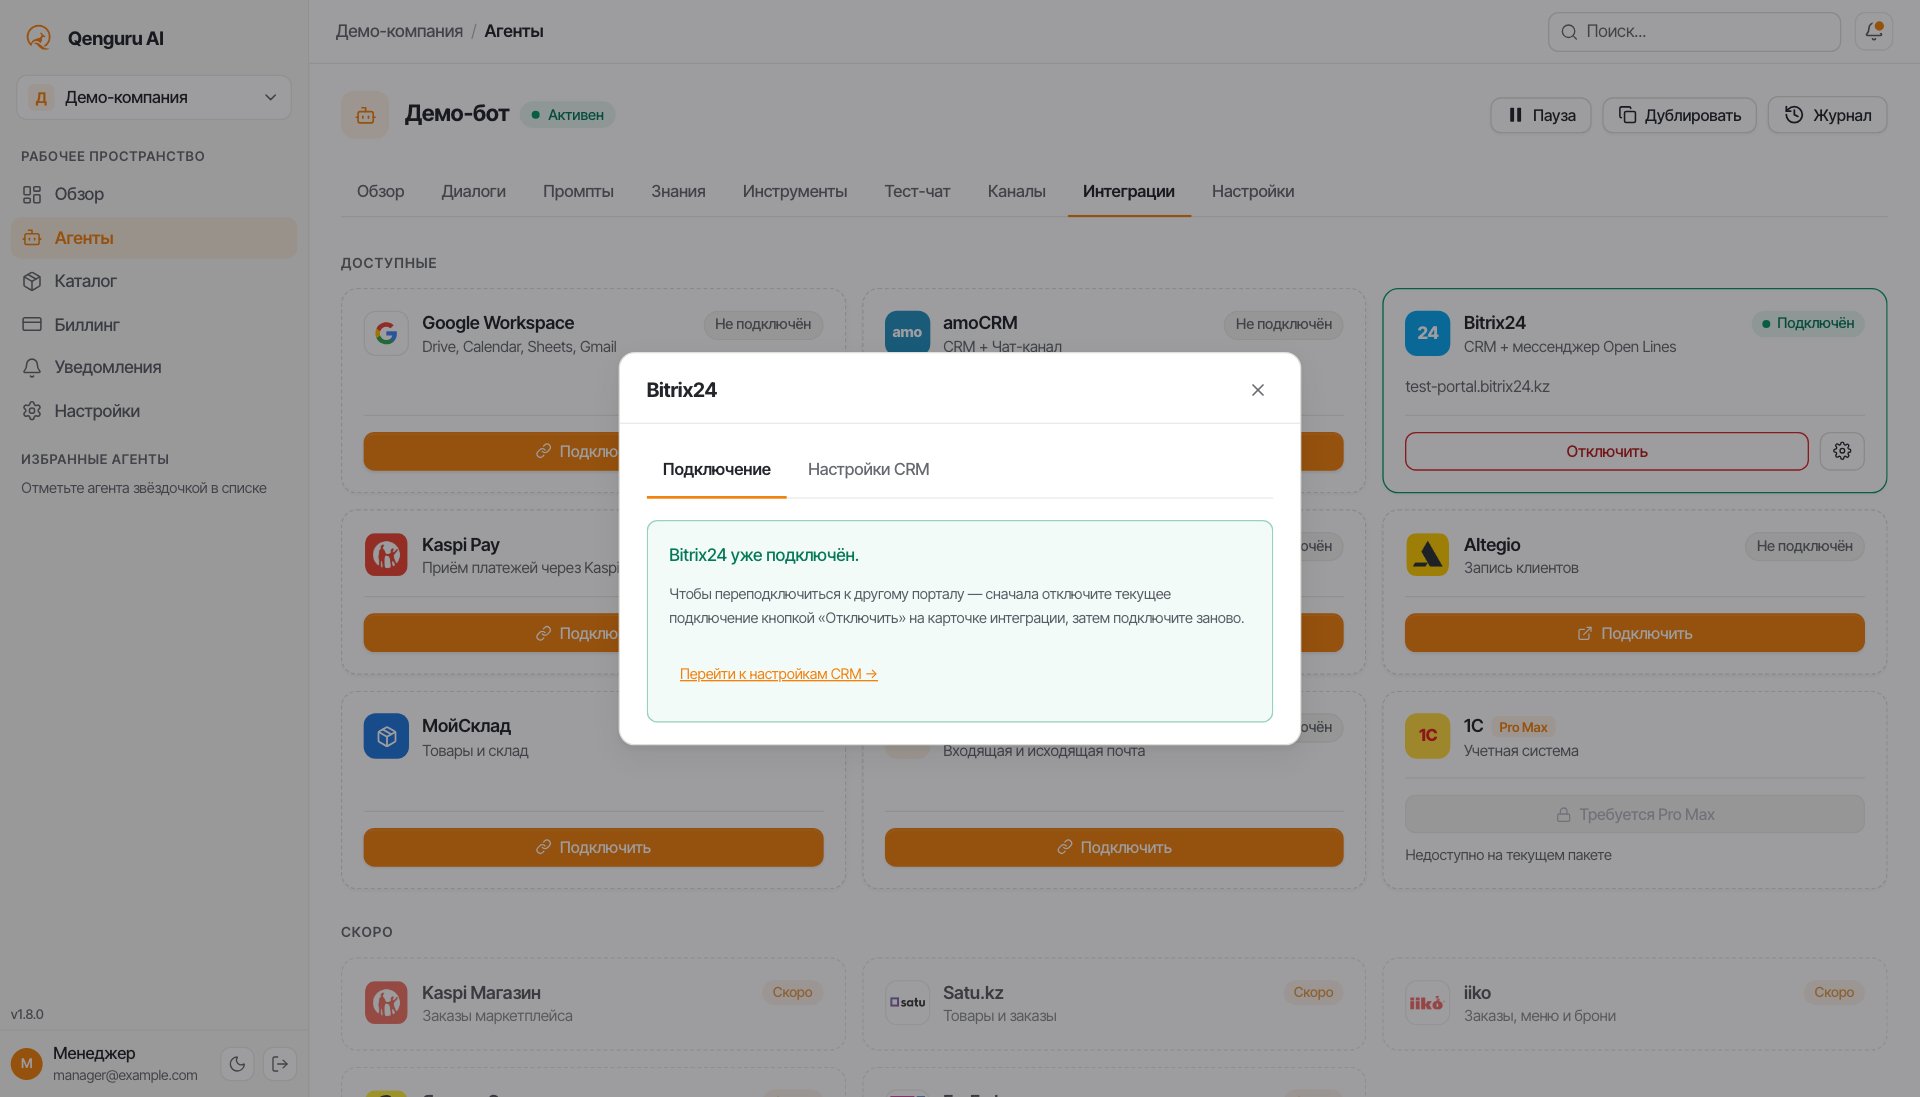
An agent is connected to one Bitrix24 portal. If you open the Connection tab of a connected integration, you will see Bitrix24 is already connected. To switch portals, first click Disconnect on the Bitrix24 card, then connect the new portal again (step 6).
Step 10. Done
From now on, whenever a customer writes to a connected channel (Telegram, WhatsApp, Instagram), QenguruAI:
- Answers the customer using the configured system prompt and knowledge base.
- Creates a contact in Bitrix24 (if “Sync on first message” is enabled).
- Creates a lead/deal in the selected pipeline and stage.
- Saves the conversation history to the customer card (as comments or in the timeline).
- Hands the conversation over to a live manager when a trigger fires (a key phrase, too many unsuccessful answers, etc.).
FAQ
- Which permissions (scopes) does the app request?
- QenguruAI requests access to the following Bitrix24 sections:
crm(contacts, leads, deals),user(user information for routing),im(chat),imopenlines(Open Lines),placement(embedding into the interface). Each scope is used only for the features described in this guide. - Where is the data physically stored?
- Qenguru servers are located in Amsterdam (DigitalOcean). Conversation history is kept for no longer than 12 months. Message content is sent to OpenAI, Anthropic and Google for LLM inference. See the Privacy Policy for details.
- Can I disable the integration?
- Yes. On the Bitrix24 card in the Integrations tab, click Disconnect — all OAuth tokens are deleted and the bot stops writing to your CRM. Leads and deals that were already created stay in Bitrix24 (Qenguru does not delete them).
- What happens if I uninstall the app from Bitrix24?
- Bitrix24 sends an
ONAPPUNINSTALLevent to the Qenguru server and we automatically revoke the stored tokens. Your Qenguru account remains, and you can connect another Bitrix24 portal later. - How do I change the responsible manager for new leads?
- Open CRM settings → the “Responsible user” drop-down → select the employee. The change is saved right away and applies to all new conversations; leads and deals that already exist are not changed.
- Can I pass custom fields to Bitrix24?
- Yes. CRM settings have a “Custom fields” section — map a bot variable (for example, the customer's budget or the chosen product) to a Bitrix24 field. The bot fills these fields automatically when it creates a lead or deal.
- What if the bot doesn't reply or leads aren't created?
- Check: (1) the integration status — it should be Connected; (2) the “CRM sync enabled” master switch; (3) the “Create leads automatically” toggle if you expect leads. If everything is on and nothing works, contact support.
Still stuck?
Contact support: support@qenguru.ai or WhatsApp +7 708 173 32 99. You can also request a demo — we'll help you set everything up in 30 minutes.